
This is the twelfth and final part of the Flare-On 6 CTF WriteUp Series.
12 - help
The challenge reads
You're my only hope FLARE-On player! One of our developers was hacked and we're not sure what they took. We managed to set up a packet capture on the network once we found out but they were definitely already on the system. I think whatever they installed must be buggy - it looks like they crashed our developer box. We saved off the dump file but I can't make heads or tails of it - PLEASE HELP!!!!!!
We have two files -
- help.dmp - A 2 GB memory dump
- help.pcapng - Packet capture
Identifying the image
For analyzing the memory dump we will be using Volatility along with WinDbg. Make sure to use the bleeding edge version of Volatility on GitHub and not the 2.6 release which is quite old.
At first we need to identify the image with imageinfo or kdbgscan command. Unfortunately, for this specific image none of the commands work out of the box as shown in the snippet below.
$ vol.py -f help.dmp imageinfo
Volatility Foundation Volatility Framework 2.6.1
INFO    : volatility.debug    : Determining profile based on KDBG search...
WARNING : volatility.debug    : Alignment of WindowsCrashDumpSpace64 is too small, plugins will be extremely slow
WARNING : volatility.debug    : Alignment of WindowsCrashDumpSpace64 is too small, plugins will be extremely slow
WARNING : volatility.debug    : Alignment of WindowsCrashDumpSpace64 is too small, plugins will be extremely slow
WARNING : volatility.debug    : Alignment of WindowsCrashDumpSpace64 is too small, plugins will be extremely slow
WARNING : volatility.debug    : Alignment of WindowsCrashDumpSpace64 is too small, plugins will be extremely slow
WARNING : volatility.debug    : Alignment of WindowsCrashDumpSpace64 is too small, plugins will be extremely slow
WARNING : volatility.debug    : Alignment of WindowsCrashDumpSpace64 is too small, plugins will be extremely slow
In such cases where Volatility is unable to infer on its own, we have to manually specify the image profile to use with the --profile flag. For example using the profile Win7SP1x64 volatility correctly identifies the image.
$ vol.py -f help.dmp --profile=Win7SP1x64 imageinfo
Volatility Foundation Volatility Framework 2.6.1
INFO    : volatility.debug    : Determining profile based on KDBG search...
          Suggested Profile(s) : Win7SP1x64, Win7SP0x64, Win2008R2SP0x64, Win2008R2SP1x64_24000, Win2008R2SP1x64_23418, Win2008R2SP1x64, Win7SP1x64_24000, Win7SP1x64_23418
                     AS Layer1 : WindowsAMD64PagedMemory (Kernel AS)
                     AS Layer2 : WindowsCrashDumpSpace64 (Unnamed AS)
                     AS Layer3 : FileAddressSpace (/home/bb/Documents/RCE-InfoSec/Flare-on 2019/12 - help/help.dmp)
                      PAE type : No PAE
                           DTB : 0x187000L
                          KDBG : 0xf80002c390a0L
          Number of Processors : 1
     Image Type (Service Pack) : 1
                KPCR for CPU 0 : 0xfffff80002c3ad00L
             KUSER_SHARED_DATA : 0xfffff78000000000L
           Image date and time : 2019-08-02 14:38:33 UTC+0000
     Image local date and time : 2019-08-02 10:38:33 -0400
Preliminary Analysis
Volatility supports a whole slew of different analysis commands. For brevity, we will only be mentioning the relevant commands but the reader is encouraged to try them all. For each of the commands we need to specify the profile using the --profile=Win7SP1x64 flag.
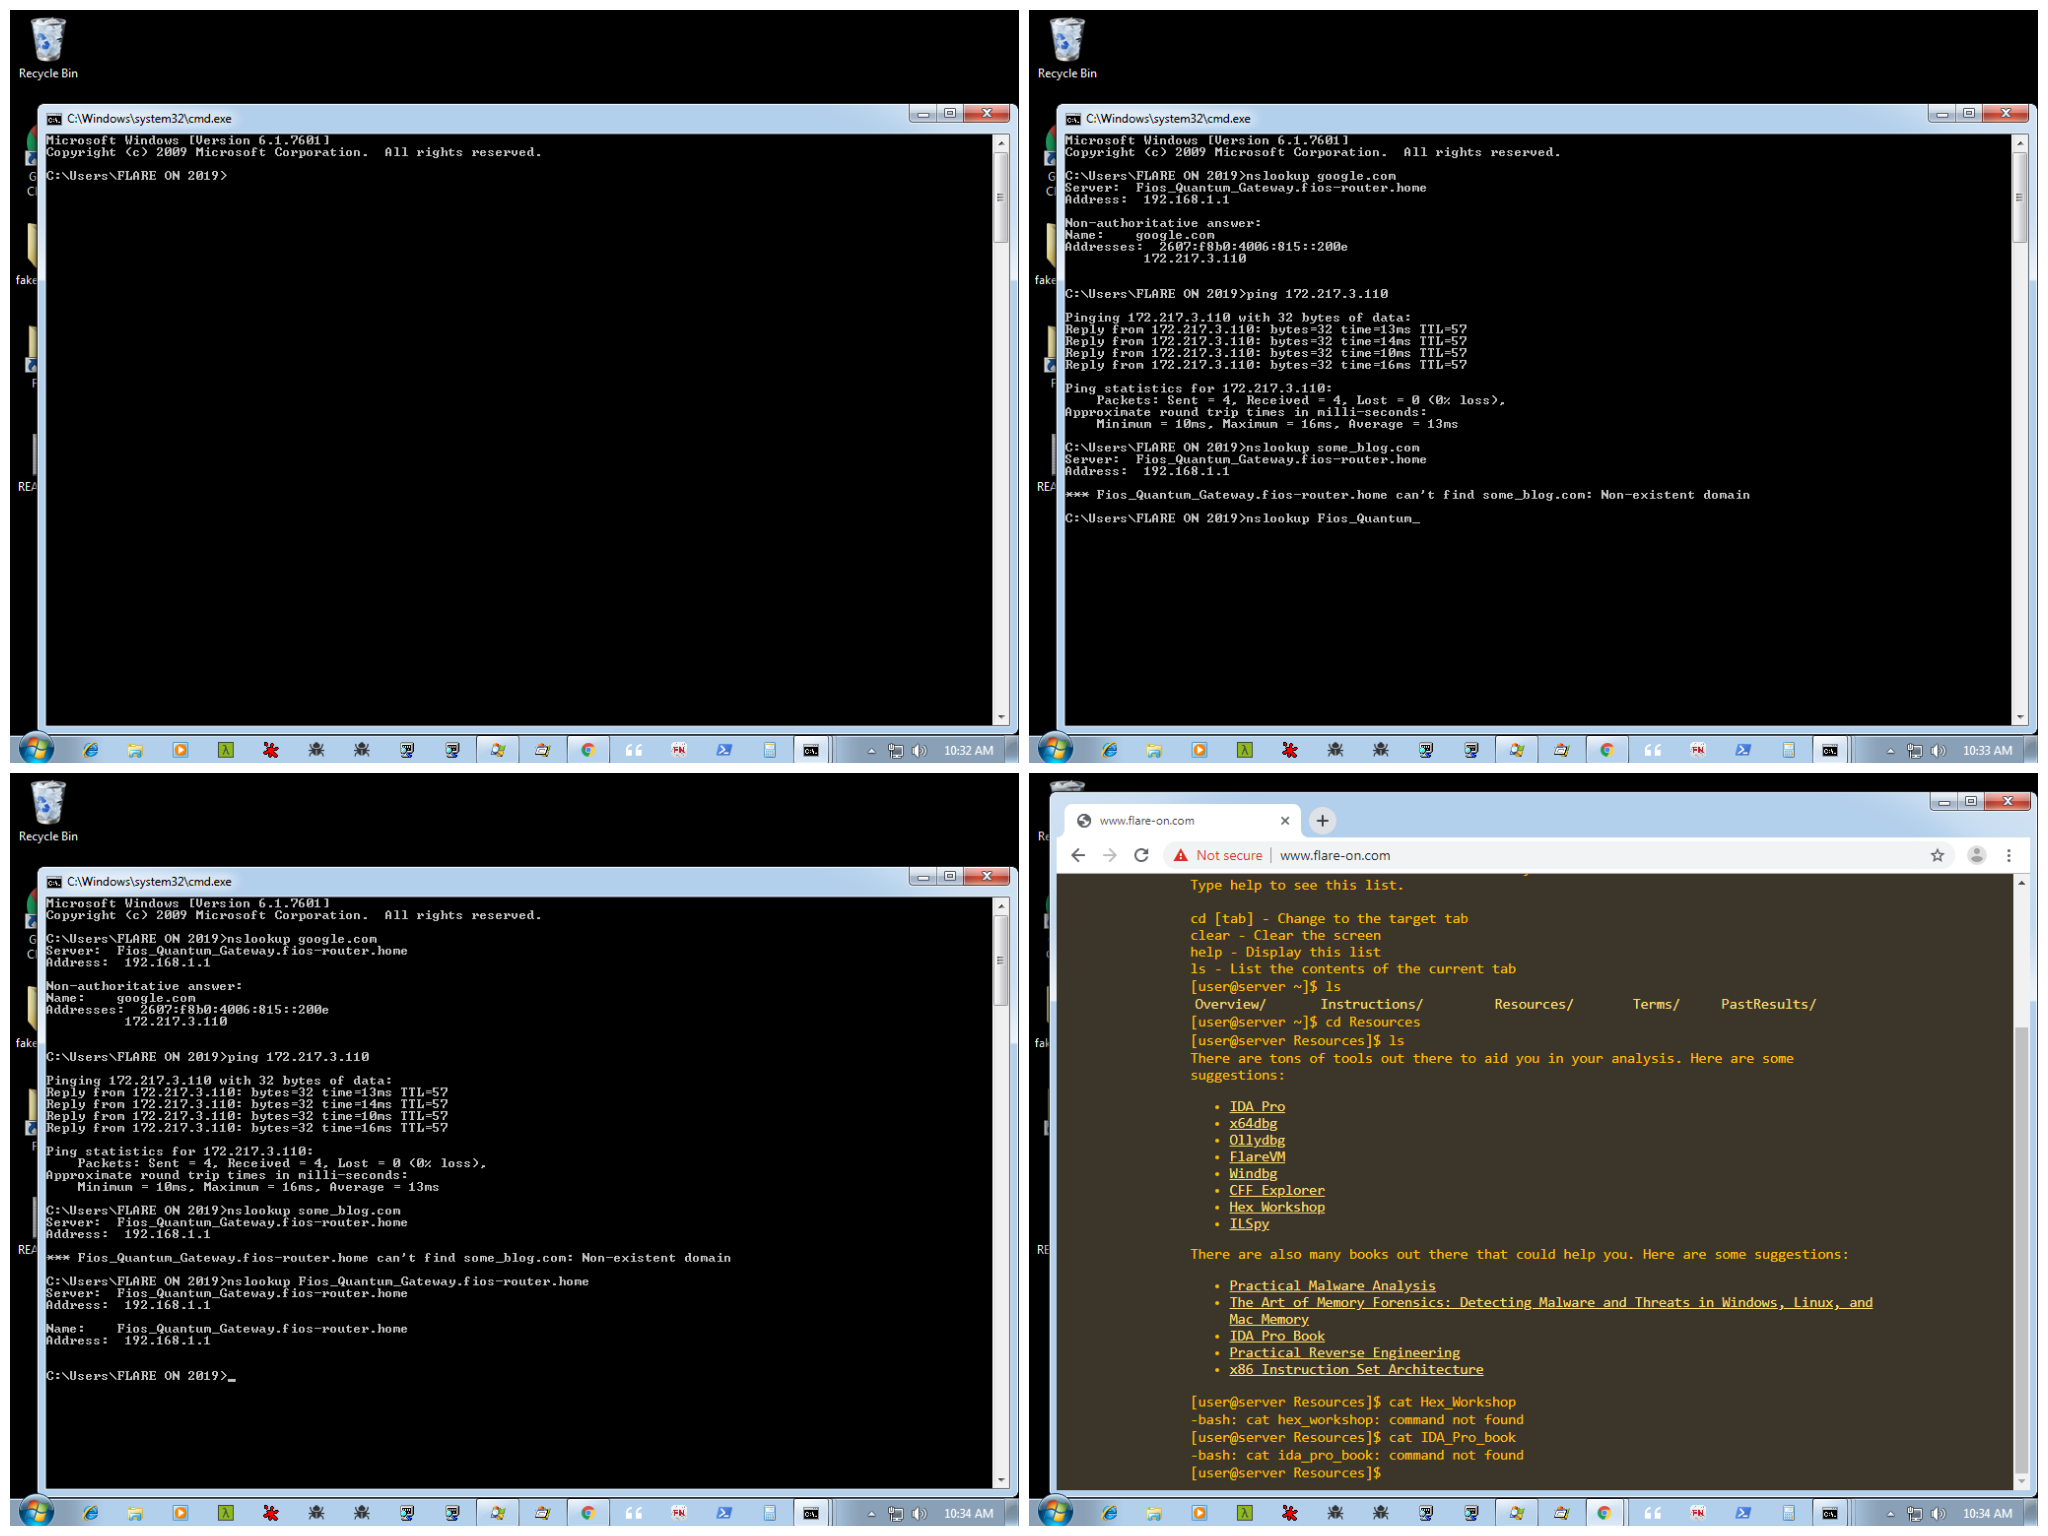
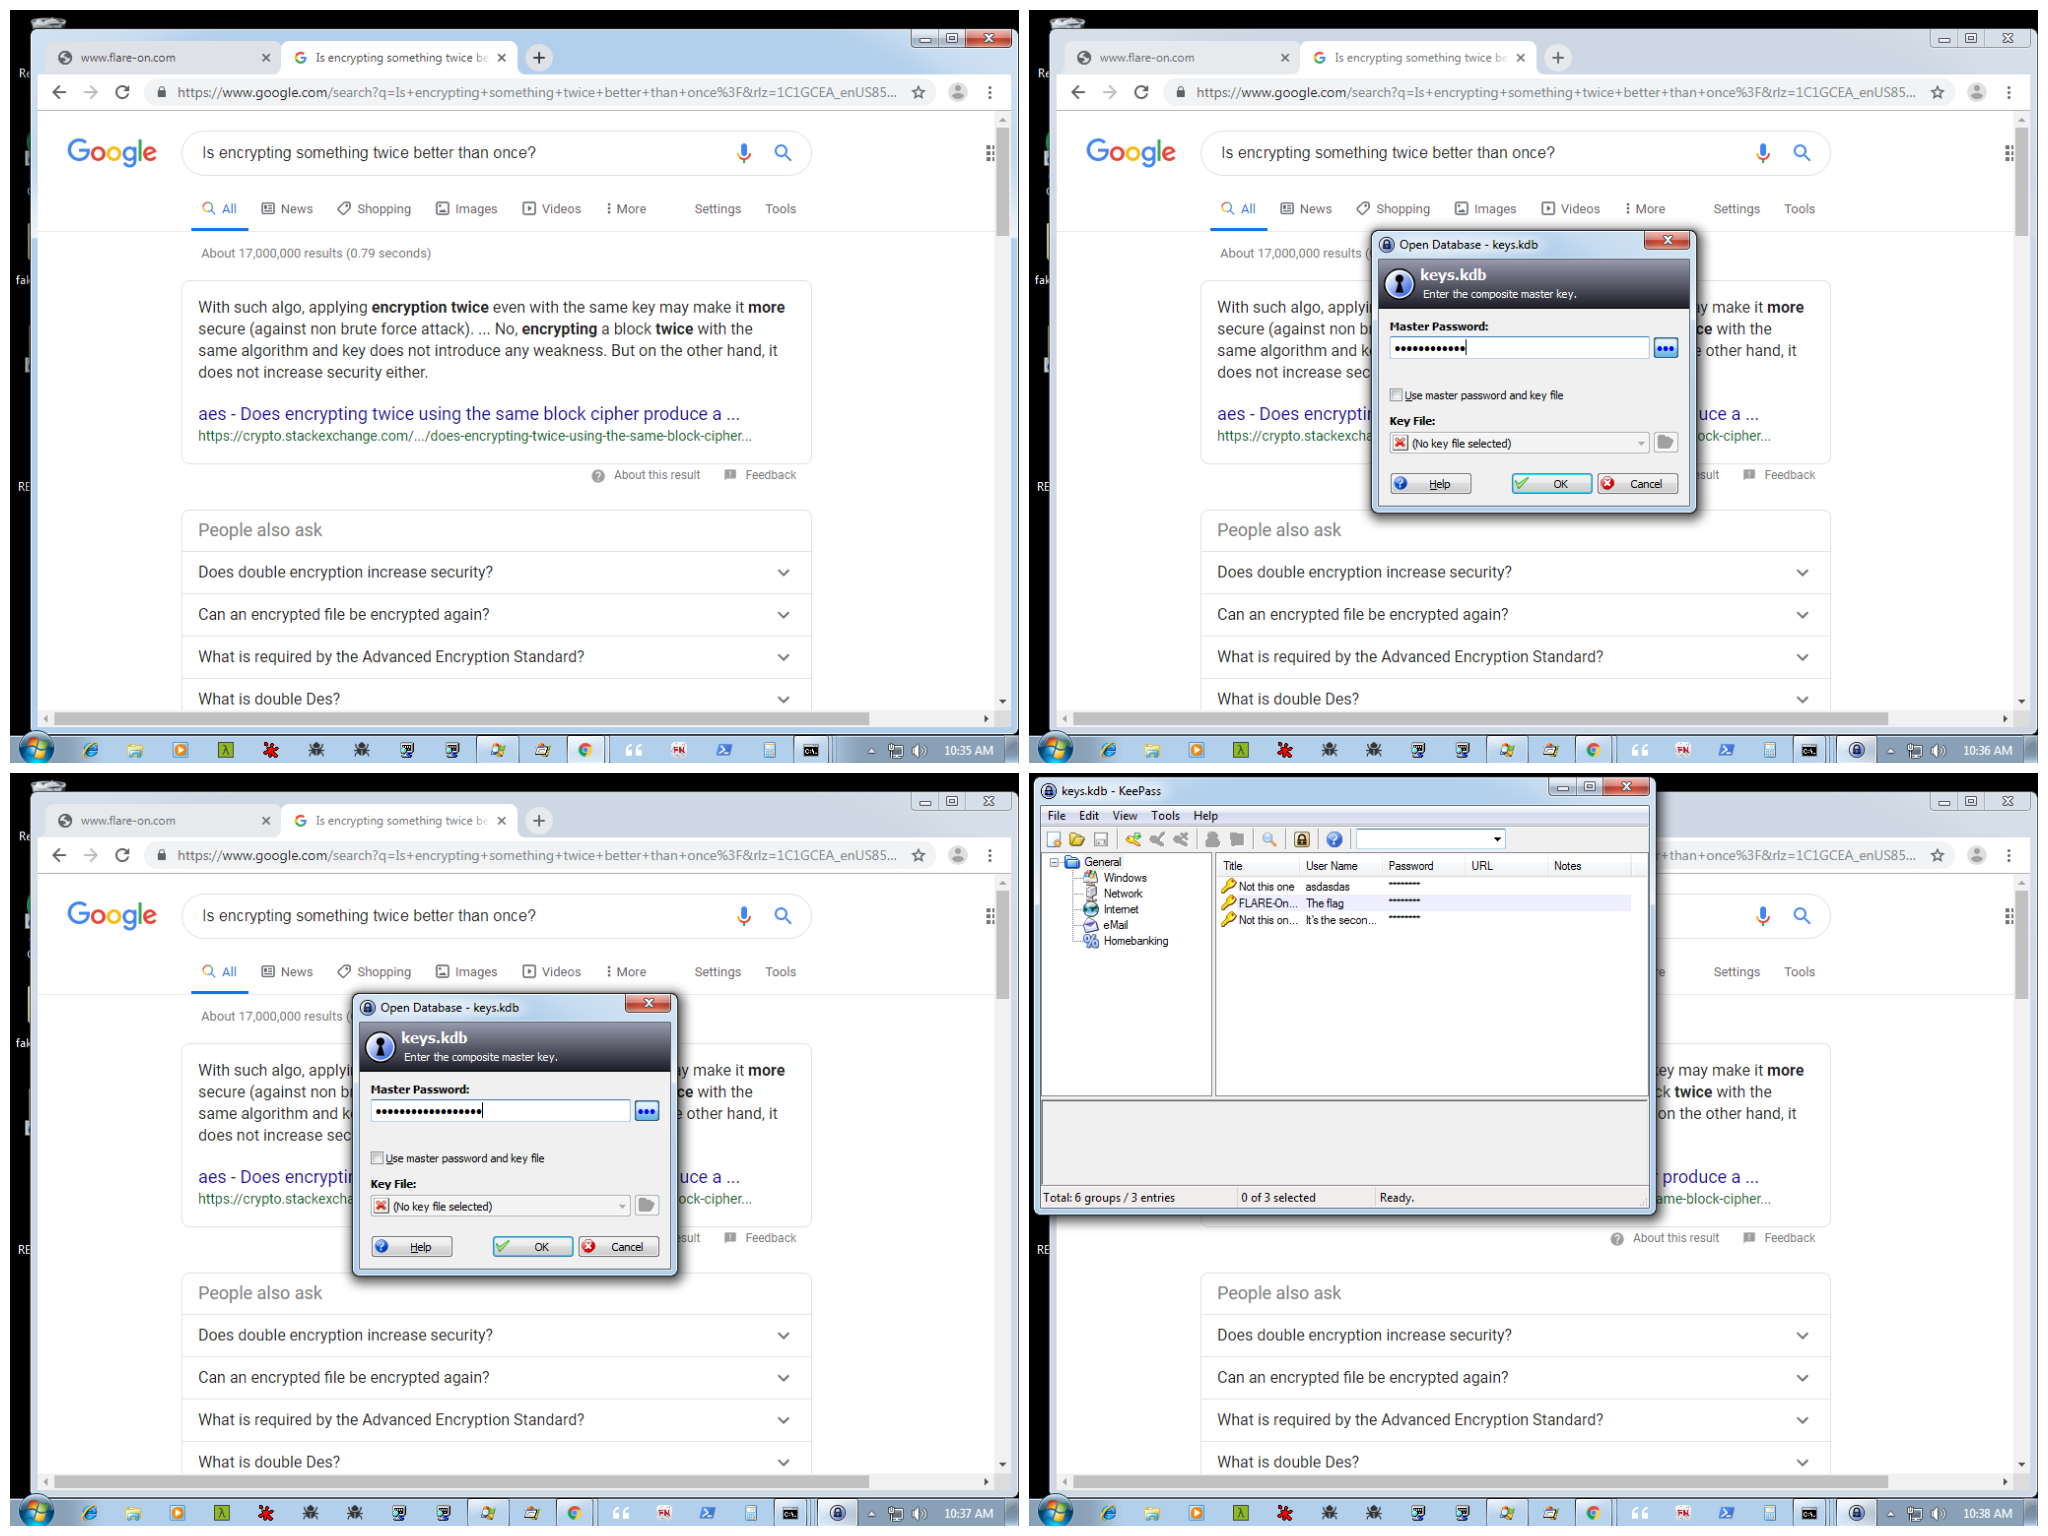
Screenshot command
This command takes a screenshot from each desktop on the system. Running the command generates several screenshots one of which looks interesting.
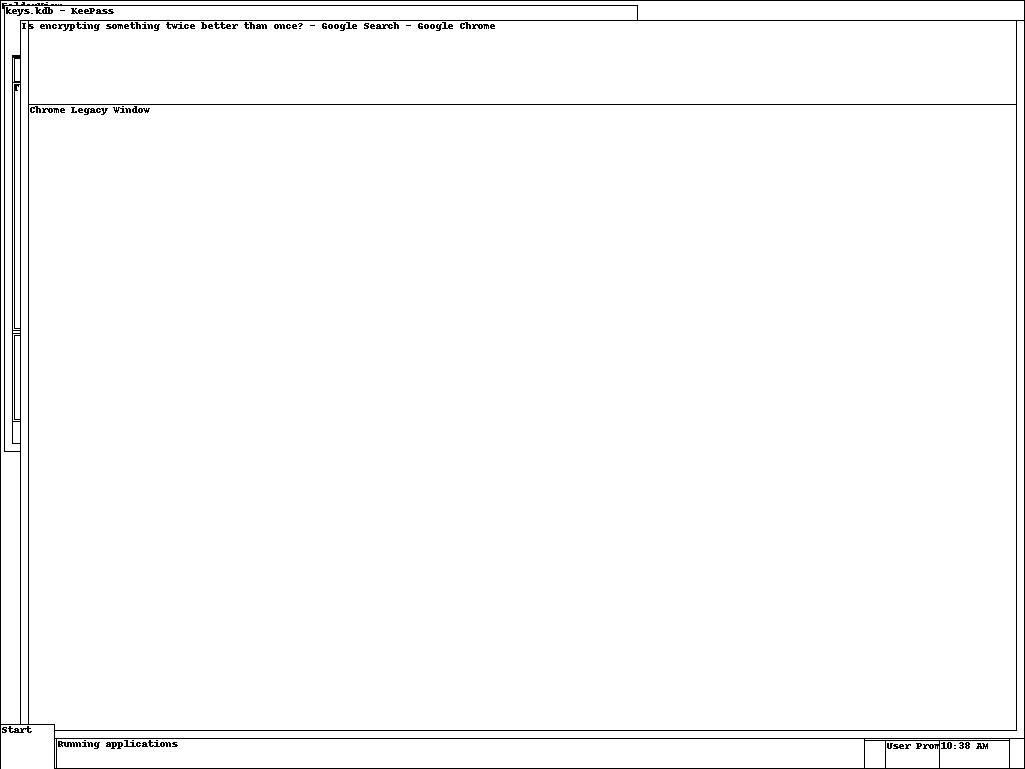
As shown in Figure 1, there is Google Chrome and KeyPass running. A database named keys.kdb is currently open in the KeyPass instance.
Modules command
This command displays the list of kernel modules that were loaded in the system at the time the memory dump was captured.
$ vol.py -f help.dmp --profile=Win7SP1x64 modules

Offset(V)          Name                 Base                             Size File
------------------ -------------------- ------------------ ------------------ ----
0xfffffa800183e890 ntoskrnl.exe         0xfffff80002a49000           0x5e7000 \SystemRoot\system32\ntoskrnl.exe
0xfffffa800183e7a0 hal.dll              0xfffff80002a00000            0x49000 \SystemRoot\system32\hal.dll

-- snip--

0xfffffa800428ff30 man.sys              0xfffff880033bc000             0xf000 \??\C:\Users\FLARE ON 2019\Desktop\man.sys
There's a driver named man.sys which was loaded from the path C:\Users\FLARE ON 2019\Desktop\man.sys. Since system drivers do not usually reside on the Desktop we can be pretty sure that this is related to the challenge.
Dumping man.sys
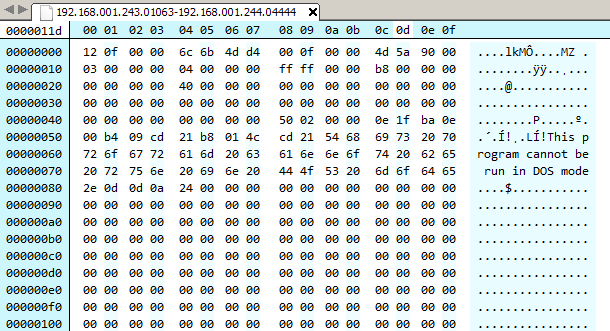
man.sys is loaded at the address 0xfffff880033bc000. We can either use Volatility or WinDbg for dumping the module. Here I have used WinDbg as I found it to work better than Volatility as far as memory dumping is concerned. Ensure that the path to the symbol server is properly set in WinDbg.
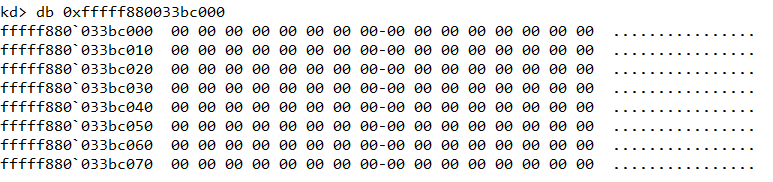
We can use the db command to hex dump a memory region. However as shown in Figure 2, the MZ header is missing from man.sys which indicate that the corresponding page must have been paged out from memory. Regardless, we can still use the .writemem command to dump a considerable chunk of memory (say 100KB) and load it as a binary file in IDA.

The dumped file is of size 60 KB. Searching for strings we locate the path to the PDB file embedded in the PE.

Dumping other drivers and DLLs
Grepping for the strings "flareon_2019" and "pdb" we can find other relevant files that are related to the challenge as shown in Figure 5.
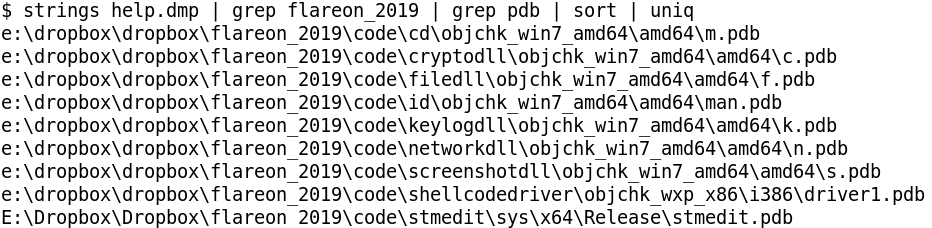
List of drivers
- stmedit
- shellcodedriver
- man
List of DLLs
- cd
- cryptodll
- filedll
- keylogdll
- networkdll
- screenshotdll
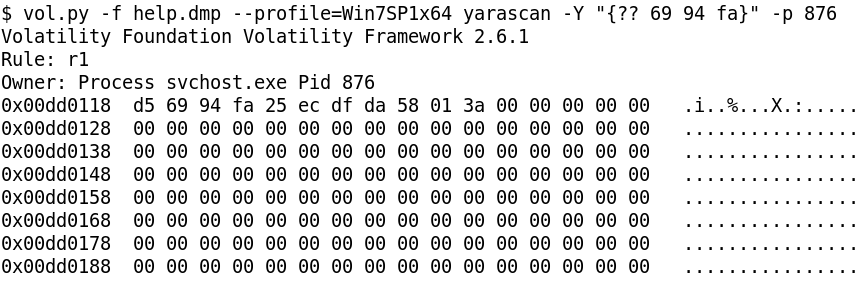
Among the drivers we already have man.sys. The other two - shellcodedriver and stmedit can be located in memory using the yarascan volatility command as shown in Figure 6.
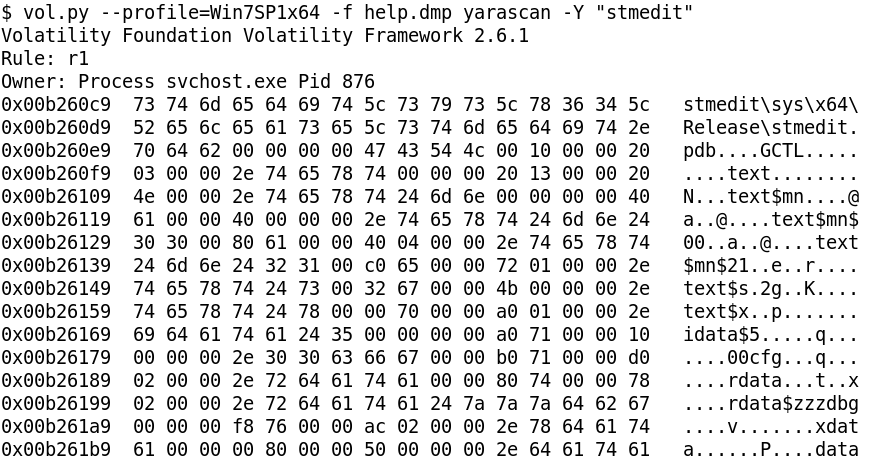
stmedit is located within memory of process svchost.exe with pid 876. Using the !process windbg extension, svchost.exe with pid 876 has its EPROCESS at fffffa80034a4b30
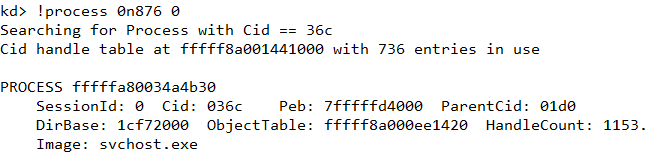
Knowing the address of EPROCESS we can set the process context using the .process command.

Navigating to b260c9 we can cross check that it indeed contains the stmedit string as found in Volatility using yarascan.
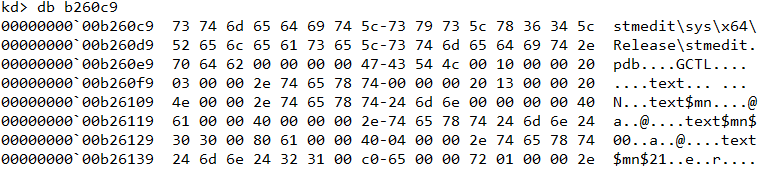
From here we can search backwards to locate the start of the MZ header as shown in Figure 10.

Next, we can use the .writemem command to dump stmedit.sys in the same way as we did earlier.

Apart from shellcodedriver (it has the MZ header missing), the same technique can be reused to dump each of the 6 DLLs. (The complete shellcodedriver file will later be found in the pcap).
Analyzing the DLLs & drivers
Before we look at the DLLs separately there are several techniques that are common across all the DLLs and drivers.
None of the DLLs import WinAPI functions statically using the IAT. Instead functions are resolved dynamically using LoadLibrary or by parsing PEB_LDR_DATA. For obtaining the addresses of the API, either GetProcessAddress is used or in some cases the export table of the module is parsed. Further to harden analysis, the names of the functions are encrypted and are only decrypted at run-time before it's about to be called.
For example in Figure 12, the rc4 function decrypts the stringCreateFileA. It is worth noting that each such string is encrypted with a different key.

The rc4 function takes four parameters -
- A pointer to the key
- Size of the key in bytes
- A pointer to the encrypted buffer. After the function returns this will hold the decrypted contents
- Size of the encrypted buffer
In Figure 12, the key and encrypted buffer are {0x91, 0xe8, 0xa5, 0x7d} and {0xbd, 0x64, 0x20, 0x46, 0xad, 0xad, 0xe8, 0x7a, 0x39, 0x7c, 0x26} respectively. This can be decrypted using the PyCryptodome Python library.
>>> from Crypto.Cipher import ARC4
>>> key = ''.join(map(chr, [0x91, 0xe8, 0xa5, 0x7d]))
>>> ct = ''.join(map(chr, [0xbd, 0x64, 0x20, 0x46, 0xad, 0xad, 0xe8, 0x7a, 0x39, 0x7c, 0x26]))
>>>
>>> ARC4.new(key*2).decrypt(ct)
'CreateFileA'
Lastly another technique common across all the DLLs is the use of a function dispatcher to make the WinAPI function call. The dispatcher takes a variable number of arguments depending on the WinAPI function it wants to call. Let's look at two examples to make it clear.
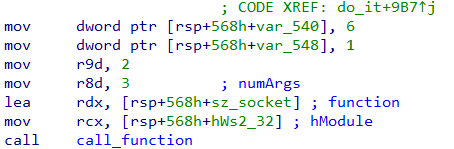
In Figure 13, the method call_function is the function dispatcher we are talking about. Here it wants to call socket which is exported from Ws2_32.dll. The first parameter is a handle to the module containing the function; the second parameter is a pointer to a buffer containing the name of the function. The name of the function is decrypted at runtime as we saw just a while ago. The third parameter indicates the number of arguments that the function requires which is 3 as socket takes three arguments. After the third comes the actual arguments to the function.
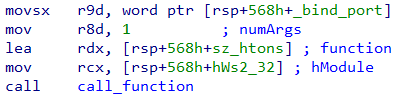
Let's consider another example as in Figure 14. The htons function exported from Ws2_32.dll takes a single parameter. Correspondingly the third parameter passed to call_function is 1. After that we have the actual argument to htons - the binding port number.
cd.dll
- Exports a function named
c - Sets up a listener on port 4444 and spawns a thread for each incoming connection
- Reads 4 bytes from the socket. This indicates the size of the payload about to follow
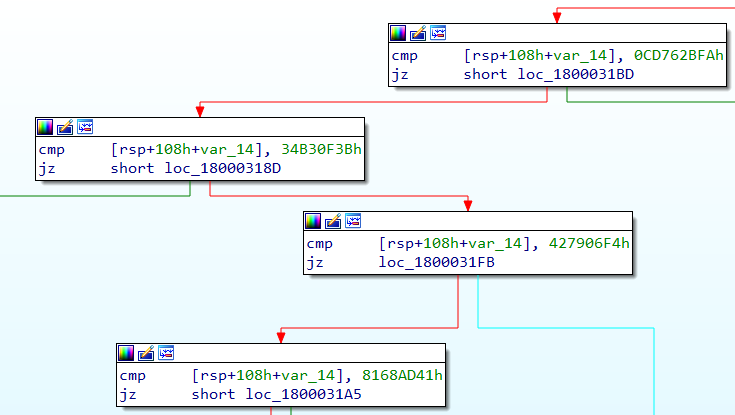
- The next 4 bytes are some sort of code (Figure 15) based on which it sends a IOCTL to a driver.
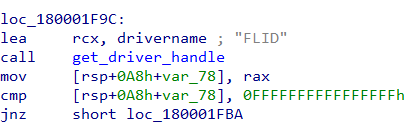
- The driver to which it sends the IOCTLs is named FLID (Figure 16).
cryptodll
- Exports a function named
e - This function takes in a single parameter - a pointer to a structure of the following form
struct Buffer_info
{
    QWORD src_buffer_size;
    LPBYTE src_buffer;
    QWORD dst_buffer_size;
    LPBYTE dst_buffer;
}- The function compresses (LZNT1) and encrypts (RC4)
src_buffertodst_buffer - For Compression it uses the NT function
RtlCompressBuffer - The key used for encryption is the current username obtained from
GetUserNameA
filedll
- Exports a function named
i - Contains functionality to create, read, write and search for a file as shown in Figure 17.

keylogdll
- Exports a function named
l - As its name suggests, the dll implements key logging functionality
networkdll
- Exports a function named
s - Contains functionality to send data to the host 192.168.1.243 at a configurable port as shown in Figure 18.

screenshotdll
- Exports a function named
t - Contains functionality to capture a bitmap screenshot of the desktop
shellcodedriver
- This is a 32-bit driver whose sole purpose is to execute a piece of shellcode in kernel space
stmedit
- This is a callout driver using Windows Filtering Platform (WFP) to modify the network traffic at runtime
- Much of the code in the driver has been taken from https://github.com/microsoft/Windows-driver-samples/blob/master/network/trans/stmedit/README.md which we can use for reference
- The purpose of the driver is to encrypt/decrypt the network traffic after/before it is-sent/reaches from/the user space application
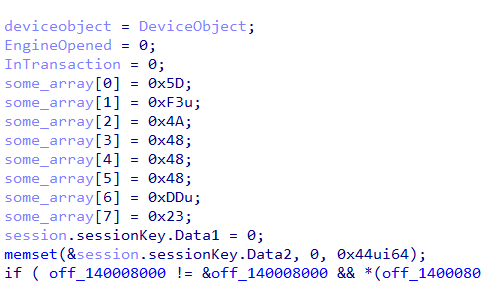
- The encryption algorithm is a simple 8 byte XOR
- One of the XOR key is hardcoded in the driver as shown in Figure 19.
- Complete analysis of the driver is out of scope of this post.
man
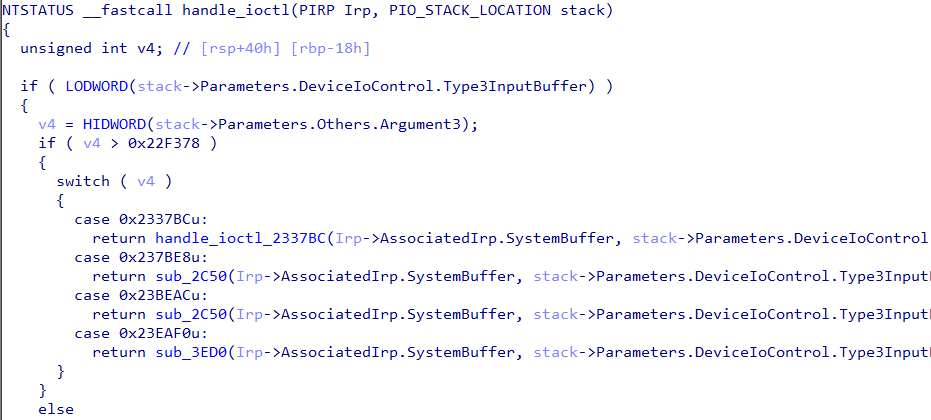
- This driver handles IOCTLs from cd.dll as in Figure 20.
- Compete understanding of this driver is not necessary to complete the challenge
Decrypting the pcap traffic
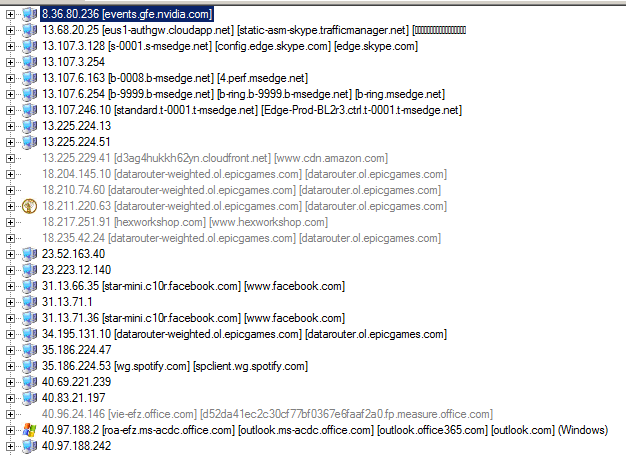
NetworkMiner is a great tool to get a quick summary of a packet capture. Using the tool we can see there are too many hosts involved. However not all of the traffic in the pcap is relevant to this challenge. By analyzing networkdll we already know that traffic to host 192.168.1.243 is related to this challenge. From cd.dll we also know any traffic to port 4444 is also relevant. All in all the following TCP streams in the pcap are important.
- Traffic to host 192.168.1.243 on ports 6666, 7777, 8888
- Traffic to host 192.168.1.244 on port 4444
To extract the TCP streams from the pcap we can use tcpflow which automatically groups them by host and port. We get 285 flows in total out of which we only need to consider the relevant traffic as just discussed.
Decrypting traffic to 192.168.1.244:4444
This traffic is just XOR encryted with the 8 byte key (5d f3 4a 48 48 48 dd 23) which we found earlier. There are 20 such TCP streams. After decrypting, one stream by virtue of its large size (4 KiB) stands out. This stream contains the complete shellcodedriver at offset 12 as shown in Figure 22.
Decrypting traffic to 192.168.1.243:6666
There are 2 such streams of sizes 50 bytes and 4.53 KiB respectively. First we need to figure out the 8 byte XOR key. Lets have a look at the 50 bytes sized stream as in Figure 23.

The first 4 bytes (encrypted) are cc 69 94 fa. We can assume that these bytes indicates the length of the stream, i.e. the data about to follow. This is because as otherwise the receiving side will have no way to know how many bytes to recv. The size of the stream is 50 (0xcc) which takes up 1 bytes of space. If the size is indicated by 4 bytes, the other three bytes will be zero. Xoring with zero has no effect which indirectly means the last three bytes will reveal a part of the key.
Indeed, if we do a yarascan for the bytes 69 94 fa in the svchost.exe process, we get exactly 1 hit which is the XOR key (d5 69 94 fa 25 ec df da) as shown in Figure 24.
The traffic here is doubly encrypted. After XOR decrypting, we need to RC4 decrypt followed by LZNT1 decompression. The key for RC4 is the username obtained from GetUserNameA. The username is FLARE ON 2019 which we can obtain from hashdump. We need to append a null byte to the username as per the docs.

The following Python script RC4 decrypts with the username followed by LZNT1 decompression.
from Crypto.Cipher import ARC4
import ctypes
import sys

def decompress(data):
	ntdll = ctypes.windll.ntdll
	RtlDecompressBuffer = ntdll.RtlDecompressBuffer

	COMPRESSION_FORMAT_LZNT1 = 0x2
	COMPRESSION_ENGINE_MAXIMUM = 256
	STATUS_SUCCESS  = 0

	RtlDecompressBuffer.argtypes = [
	            ctypes.c_ushort, # USHORT CompressionFormat
	            ctypes.c_void_p, # PUCHAR UncompressedBuffer
	            ctypes.c_ulong,  # ULONG  UncompressedBufferSize
	            ctypes.c_void_p, # PUCHAR CompressedBuffer
	            ctypes.c_ulong,  # ULONG  CompressedBufferSize
	            ctypes.c_void_p, # PULONG FinalUncompressedSize
	]

	RtlDecompressBuffer.restype = ctypes.c_uint
	finaluncompsize = ctypes.c_ulong(0)
	comp_buffer = ctypes.create_string_buffer(data)
	uncomp_buffer = ctypes.create_string_buffer(len(comp_buffer)*1)

	res = RtlDecompressBuffer(
		COMPRESSION_FORMAT_LZNT1,
		ctypes.byref(uncomp_buffer),
		ctypes.c_ulong(len(uncomp_buffer)),
		ctypes.byref(comp_buffer),
		ctypes.c_ulong(len(comp_buffer)),
		ctypes.byref(finaluncompsize)
	)
	print res
	if res == 0:
		return uncomp_buffer[0:finaluncompsize.value]
	else:
		return None

def decrypt(ct, key):
	arc4 = ARC4.new(key)
	pt = arc4.decrypt(ct)
	return pt

def decrypt_and_decompress(data, key):
	decry = decrypt(data, key)
	return decompress(decry)

key = 'FLARE ON 2019' + '\x00'
ct = open(sys.argv[1], 'rb).read()
pt = decrypt_and_decompress(ct, key+'\x00')
open('output.bin', 'wb').write(pt)
After double decryption, one of the files contain the text "C:\keypass\key.kdb"

Decrypting traffic to 192.168.1.243:7777
There are 12 such streams. The 8 byte XOR key can similarly be found as we did for 6666. It is 4a 1f 4b 1c b0 d8 25 c7. It's also doubly encrypted. After decrypting we get bitmap files some of which are shown in Figure 27 and Figure 28.
Looking at the images we come to know about our objective. Our much coveted flag is in a KeePass database named keys.kdb. The password of the KeyPass database is of size 18 characters.
Decrypting traffic to 192.168.1.243:8888
There are 5 streams. The XOR key is f7 8f 78 48 47 1a 44 9c. It's also doubly encrypted. The traffic consists of keylogger captured data as we can see in Figure 29.
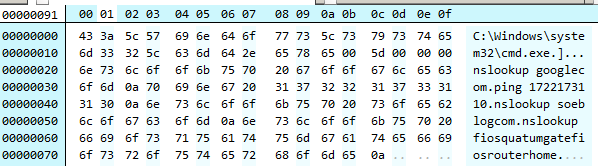
Also note that the keylogger captured some keystrokes wrong. For instance from Figure 26, the user typed nslookup some_blog.com whereas the keylogger captured nslookup soeblogcom.
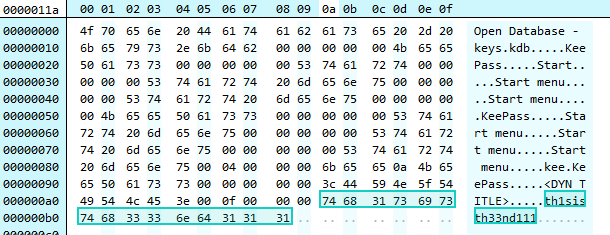
In another file we find the string "th1sisth33nd111" which looks to be the password for keys.kdb
Retrieving the KDB
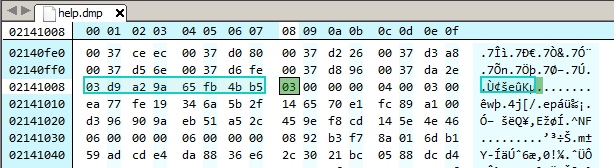
A KDB 1.x file begins with the bytes 03 D9 A2 9A 65 FB 4B B5. Searching for these bytes in the dump we can locate the kdb file.
Unfortunately, using the password "th1sisth33nd111" fails to open the kdb. This is possible as the keylogger is buggy and doesn't capture all key strokes correctly. Also from the screenshots we know the length of the password is 18 whereas the keylogg'd password is of size 15.
Figuring out the correct password
Searching for "th3" we locate a 16 character string which looks to be a part of the correct password.
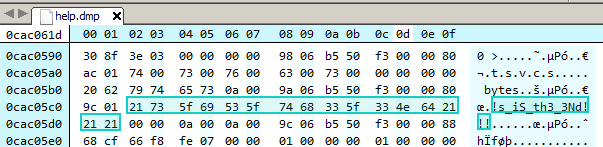
The correct password to the keypass database can be thus inferred and is "Th!s_iS_th3_3Nd!!!". Opening the kdb file we finally have the much coveted flag.
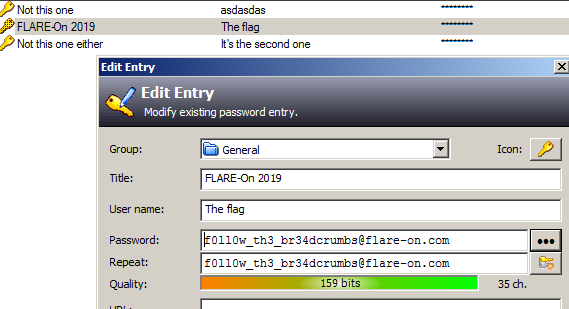
Flag: f0ll0w_th3_br34dcrumbs@flare-on.com
Final Words
With this we come to end of the Flare-on 2019 CTF write-up series. Barring the final two, the challenges this year were slightly easier that the last year. Hope you liked the write-ups. If you have any queries or suggestions, feel free to leave a comment below.


)
)
)